> ## Documentation Index
> Fetch the complete documentation index at: https://docs.clickpesa.com/llms.txt
> Use this file to discover all available pages before exploring further.
# The Hosted Checkout Page
> Hosted Checkout is a feature that facilitates seamless payments for customers of ClickPesa merchants. It allows users to pay for Payment Pages, Invoices,...
## Introduction
Hosted Checkout is a feature that facilitates seamless payments for customers of ClickPesa merchants. It allows users to pay for [Payment Pages](/dashboard/payment-pages), [Invoices](/dashboard/e-invoice), or [Checkout Links](/checkout/checkout-link) with ease. This document provides an overview of how this feature works and guides users through common use cases.
## How to Use checkout
To utilize Hosted Checkout, users need to follow these steps:
## **Accessing a Valid Link**
To initiate a payment, users must have a valid [Payment Page link](/dashboard/payment-pages), [Invoice link](/dashboard/e-invoice), or [Checkout-Link Link](/checkout/checkout-link). Invoice and Payment Page links can be found in the ClickPesa dashboard in their respective sections and for Checkout-link Link, please see [Checkout Link documentation](/checkout/checkout-link) to learn more about generating checkout links.
### Payment Page
When customers visit the Payment page, they will see the amount set for the payment page and its currency, and the payment page name, if the payment page has a customer then the customer’s name will be displayed. It will also show the merchant’s email at the bottom which customers can use to contact the merchant.
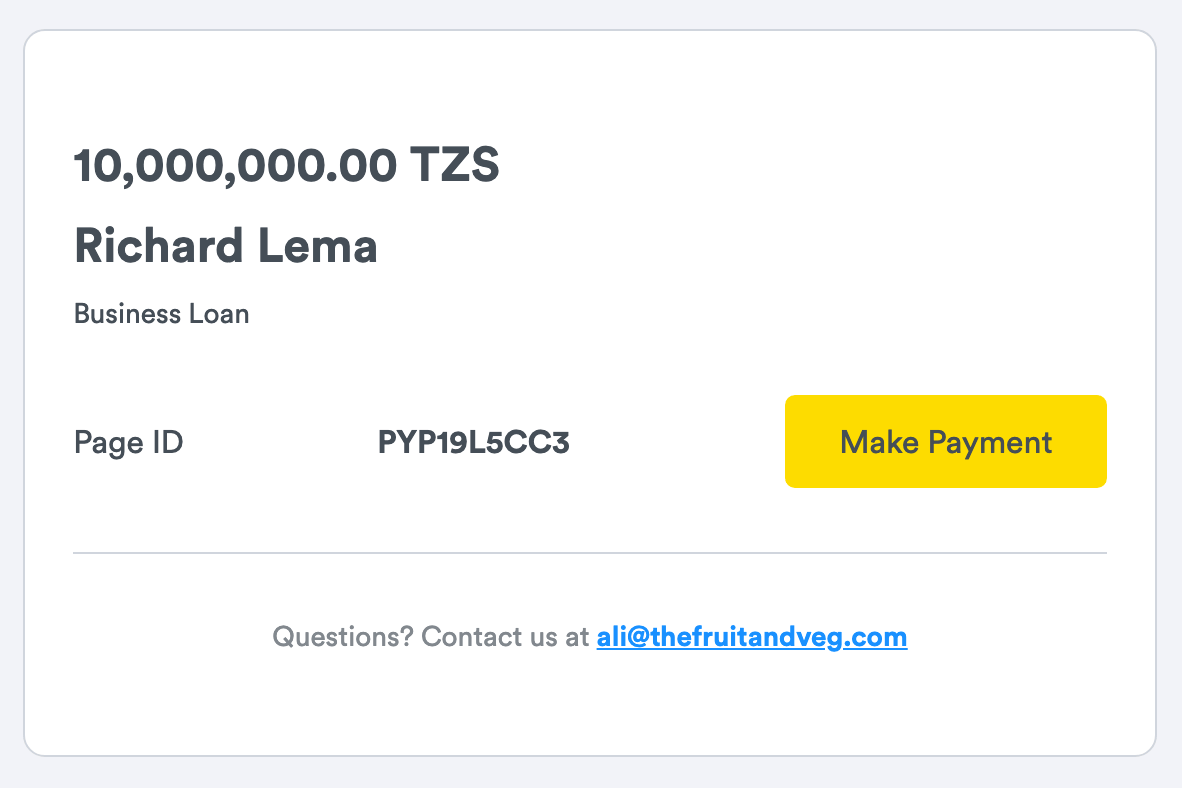 Lastly, there is a button called “Make Payment” which will open a drawer and allow the customer to fill in the details needed to make their payment. More about making payments in the section about [Filling Payment Details](#filling-details).
### Invoice
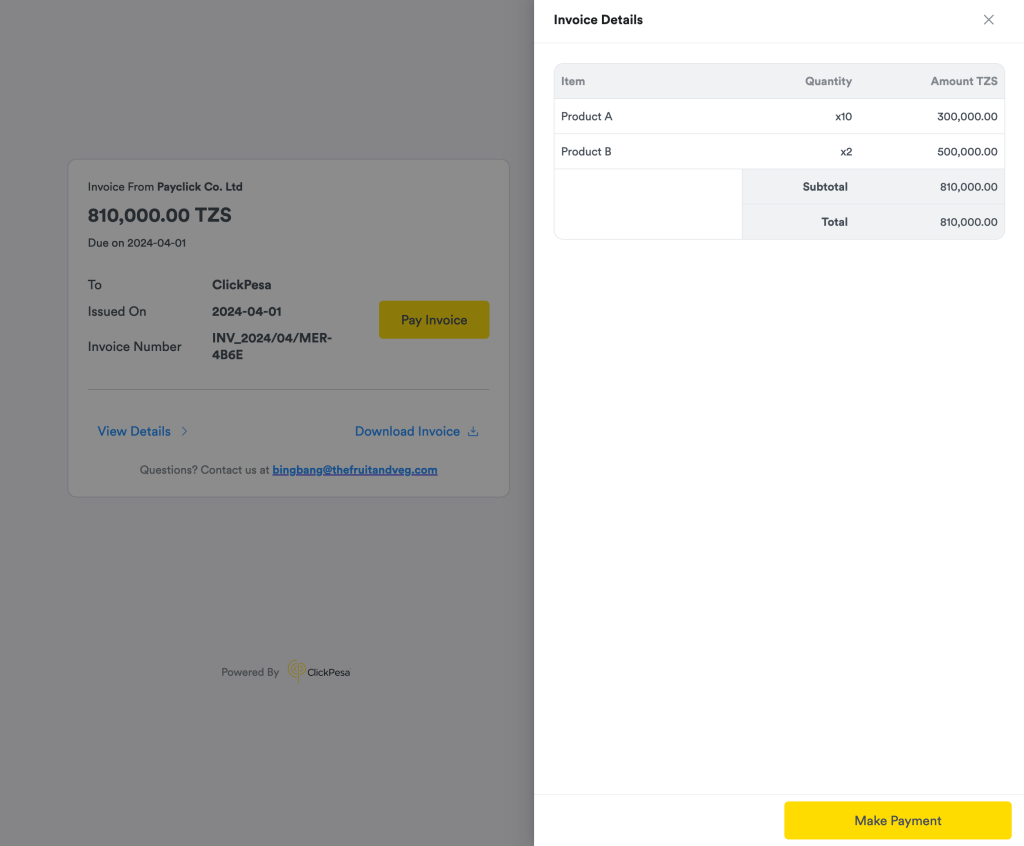
When customers visit the Invoice link, they will see the name of the merchant who sent the invoice, the invoice amount and currency, the invoice due date if available, the customer name if the customer was added during invoice creation, the invoice number, an option to view details which will show all items added to the invoice, the merchant’s email at the bottom which customers can use to contact the merchant.
Lastly, there is a button called “Make Payment” which will open a drawer and allow the customer to fill in the details needed to make their payment. More about making payments in the section about [Filling Payment Details](#filling-details).
### Invoice
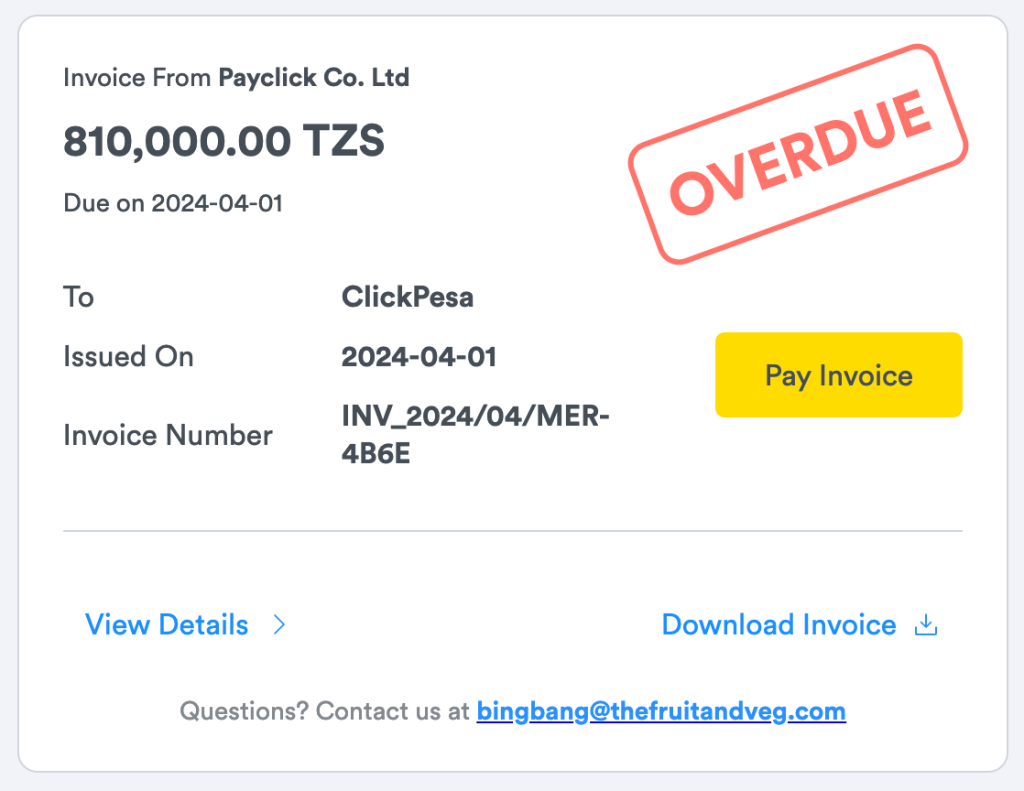
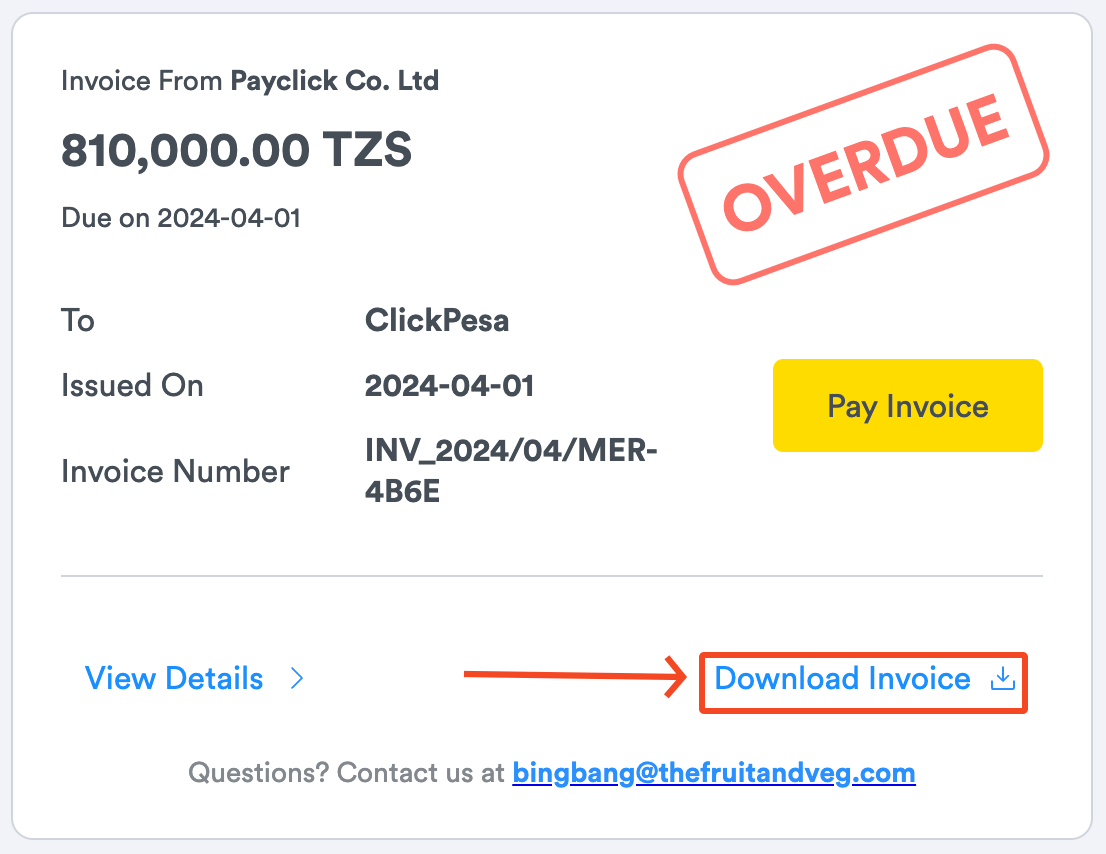
When customers visit the Invoice link, they will see the name of the merchant who sent the invoice, the invoice amount and currency, the invoice due date if available, the customer name if the customer was added during invoice creation, the invoice number, an option to view details which will show all items added to the invoice, the merchant’s email at the bottom which customers can use to contact the merchant.
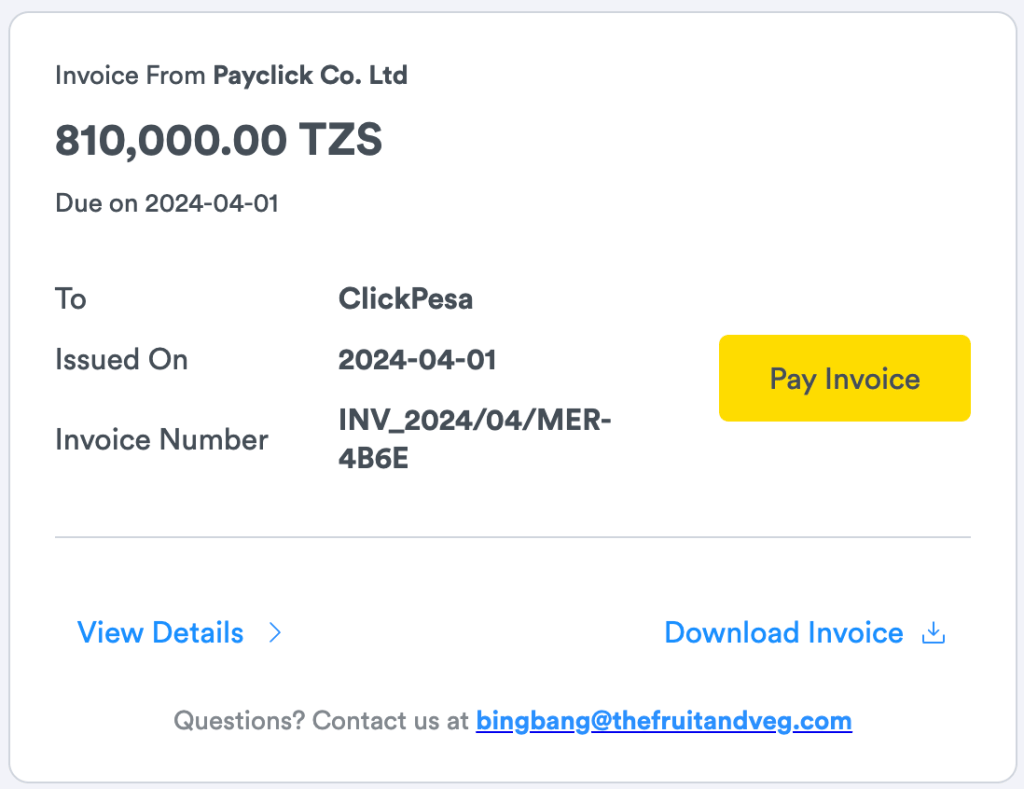 The invoice also shows the invoice status, we have three statuses for invoices, OVERDUE, PARTIAL PAID and PAID. If an invoice is paid it's going to have PAID status stamped on it, if invoice total payments amount is less than the invoice amount, the status is PARTIAL PAID and if the invoice payments are overdue it's going to have an OVERDUE status stamped on it.
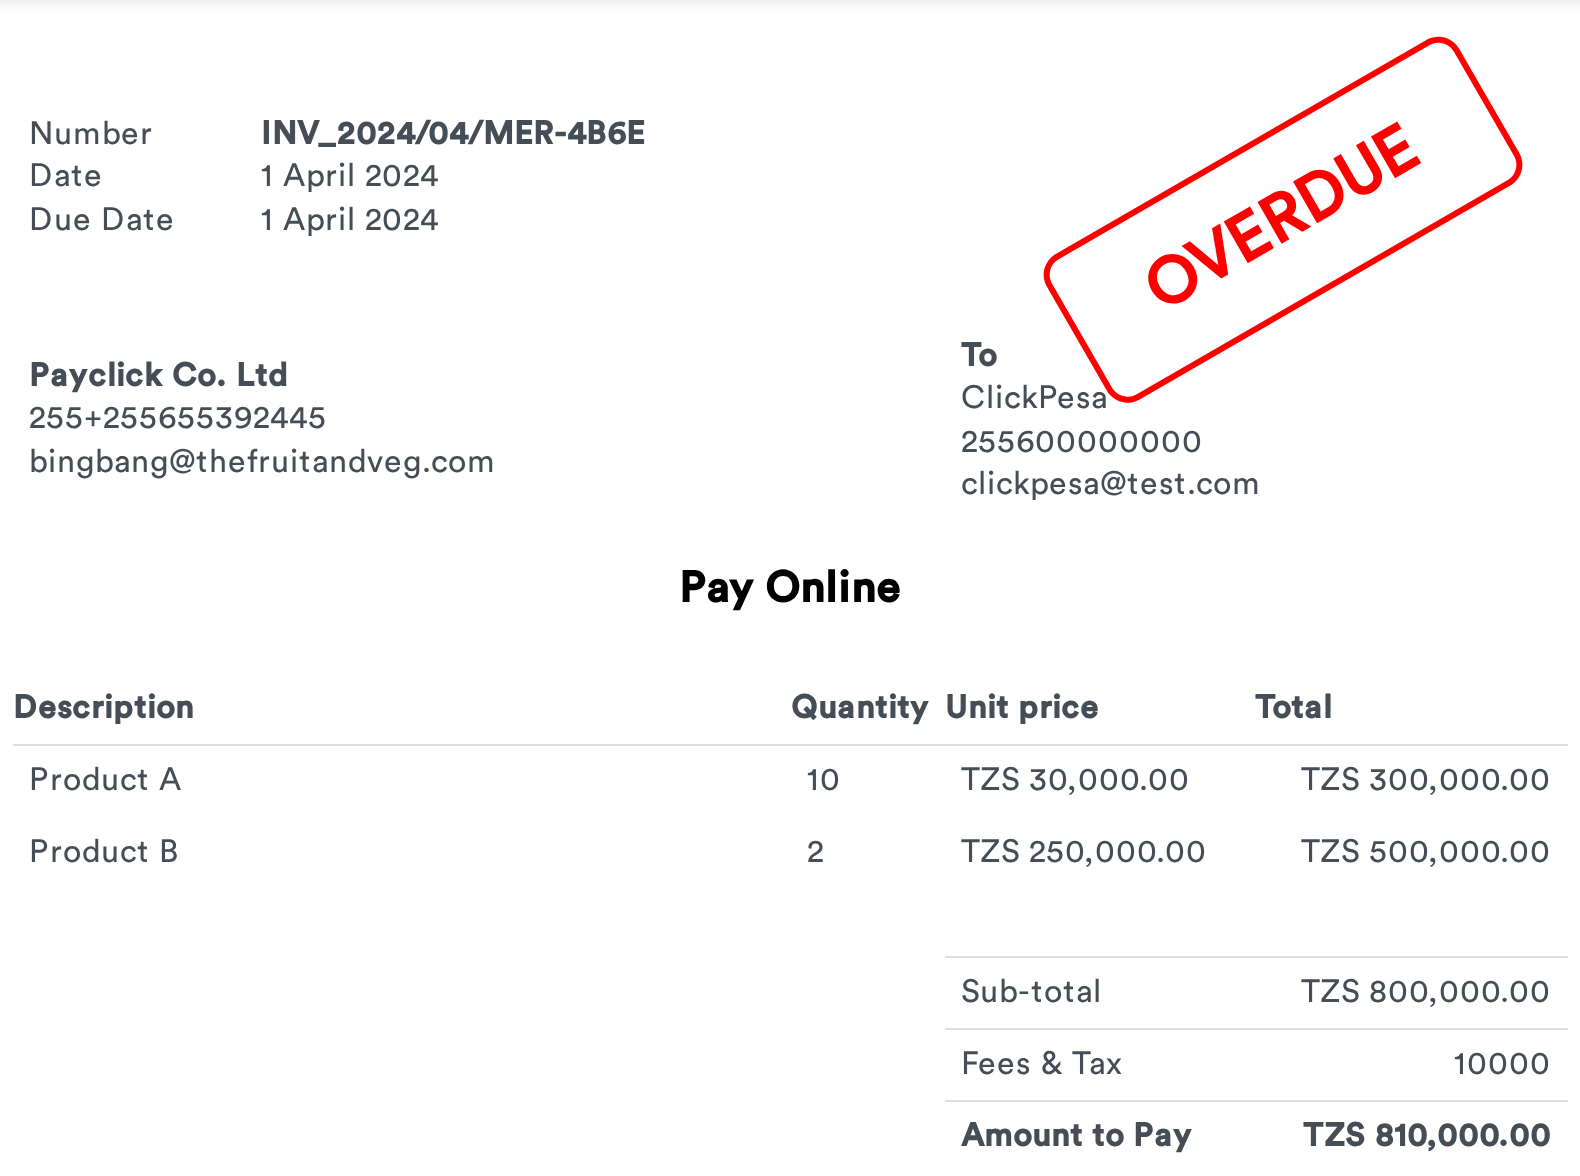
 **Download invoice as pdf file.**
You can download invoice as pdf file and share it with your customers. When they open the file they wil be able to open checkout from within a file as we embedded an invoice link.
**Download invoice as pdf file.**
You can download invoice as pdf file and share it with your customers. When they open the file they wil be able to open checkout from within a file as we embedded an invoice link.
 Lastly, there is a button called “Make Payment” which will open a drawer and allow the customer to fill in the details needed to make their payment. More about making payments in the section about [Filling Payment Details](#filling-details).
### Checkout Link
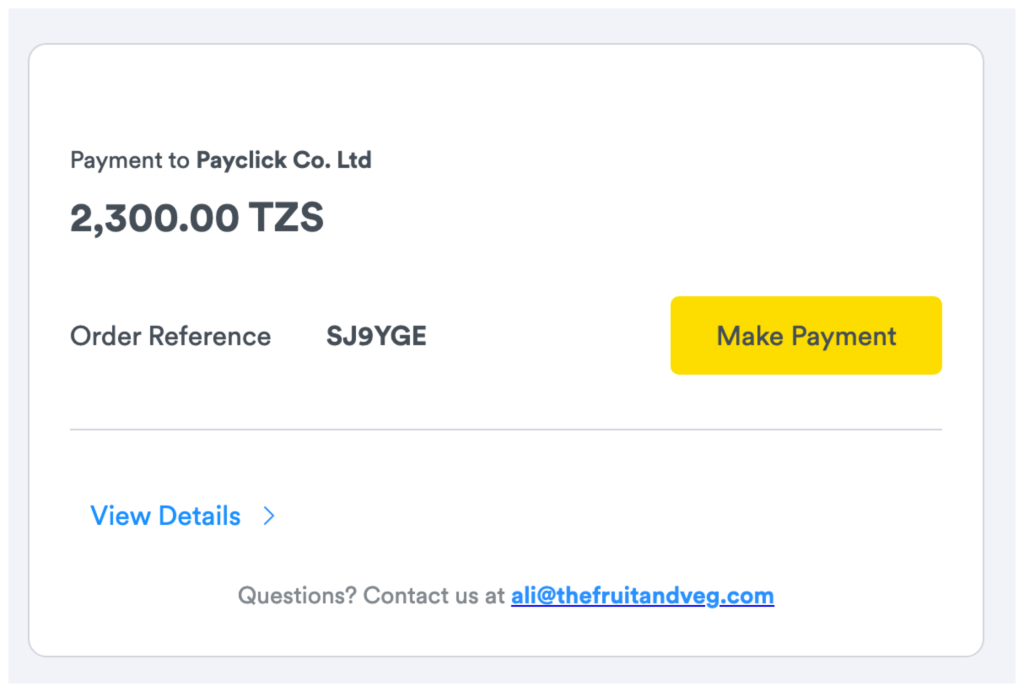
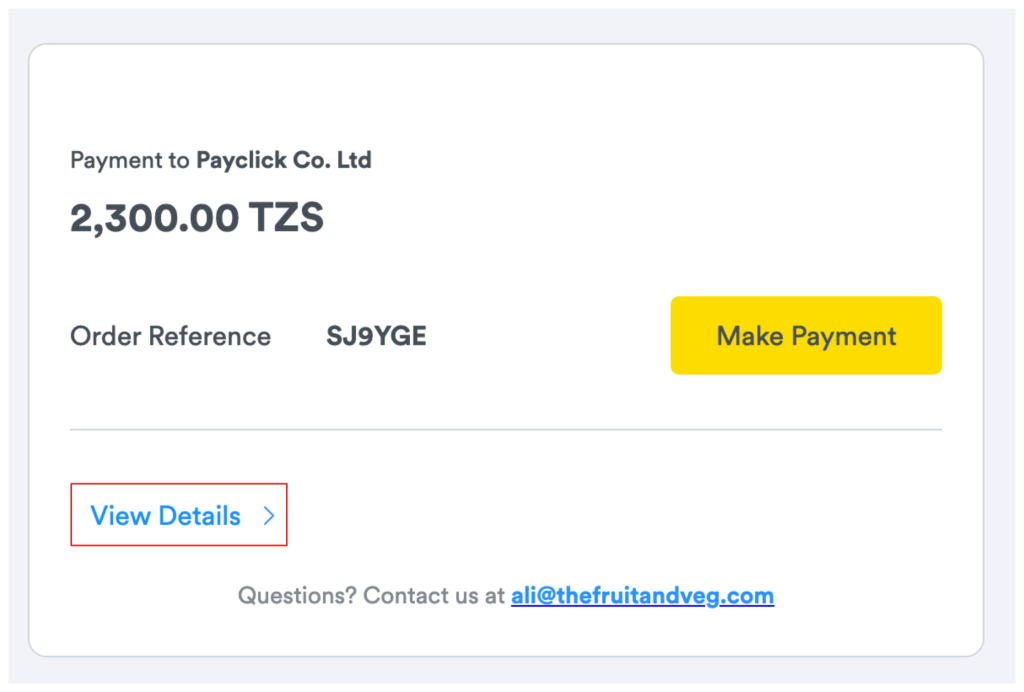
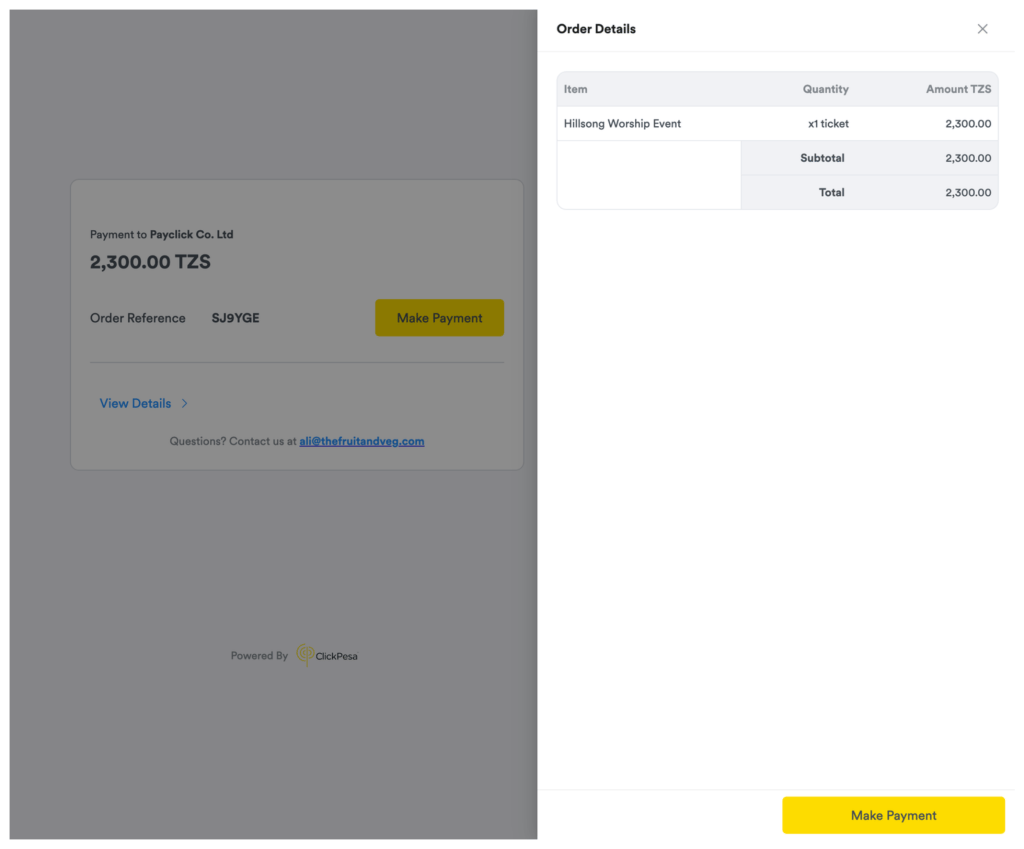
When customers visit the checkout link, they will see the name of the merchant who sent the checkout link, the checkout link amount and currency, the order reference that was provided during checkout link creation, the customer name if the customer was added during checkout link creation, an option to view details which will show all items added to the checkout link, the merchant’s email at the bottom which customers can use to contact the merchant.
Lastly, there is a button called “Make Payment” which will open a drawer and allow the customer to fill in the details needed to make their payment. More about making payments in the section about [Filling Payment Details](#filling-details).
### Checkout Link
When customers visit the checkout link, they will see the name of the merchant who sent the checkout link, the checkout link amount and currency, the order reference that was provided during checkout link creation, the customer name if the customer was added during checkout link creation, an option to view details which will show all items added to the checkout link, the merchant’s email at the bottom which customers can use to contact the merchant.
 Lastly, there is a button called “Make Payment” which will open a drawer and allow the customer to fill in the details needed to make their payment. More about making payments in the section about [Filling Payment Details](#filling-details).
 ## Filling Payment Details
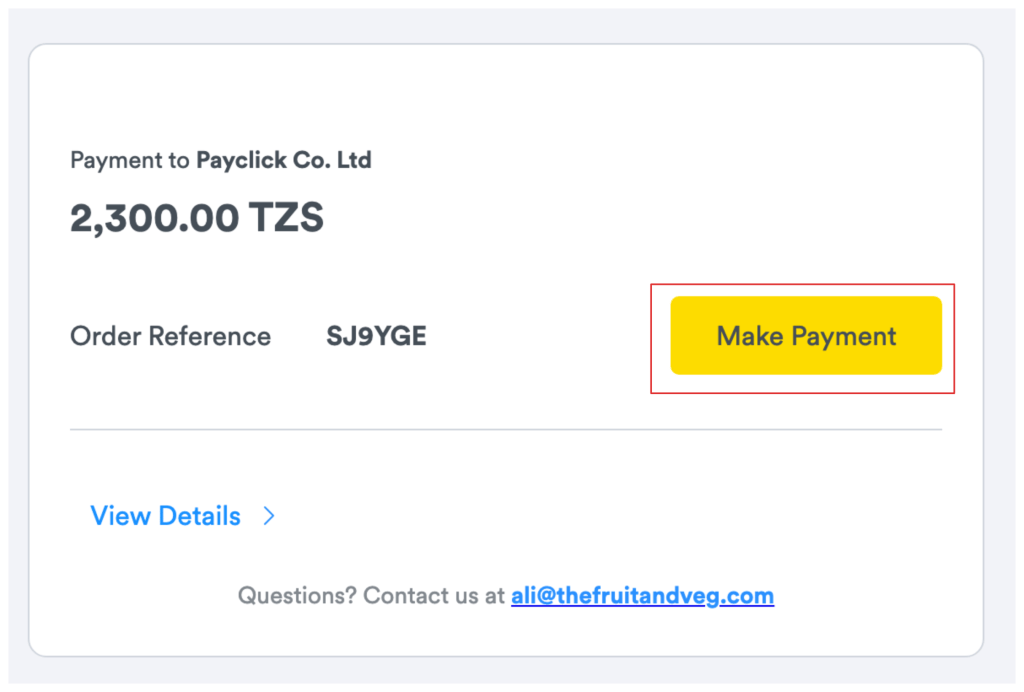
When a customer visits a valid Payment Page, Invoice, or Checkout-Link link, they will see comprehensive details about the payment. This information includes the payment amount, the entity receiving the payment, and the customer's name if provided. Users can proceed by clicking the "Make Payment" button.
## Filling Payment Details
When a customer visits a valid Payment Page, Invoice, or Checkout-Link link, they will see comprehensive details about the payment. This information includes the payment amount, the entity receiving the payment, and the customer's name if provided. Users can proceed by clicking the "Make Payment" button.
 ### **Customer Details Section**
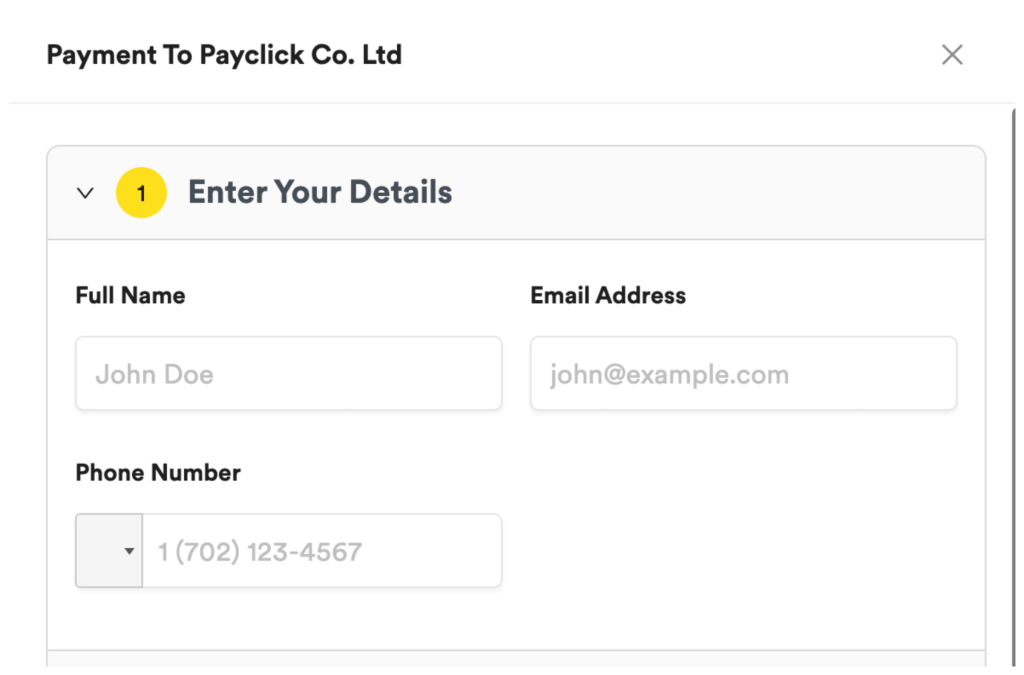
If the Payment Page, Invoice, or Checkout-Link lacks customer details, users will be prompted to enter their full name, email, and phone number in this section.
### **Customer Details Section**
If the Payment Page, Invoice, or Checkout-Link lacks customer details, users will be prompted to enter their full name, email, and phone number in this section.
 ### **Amount Section**
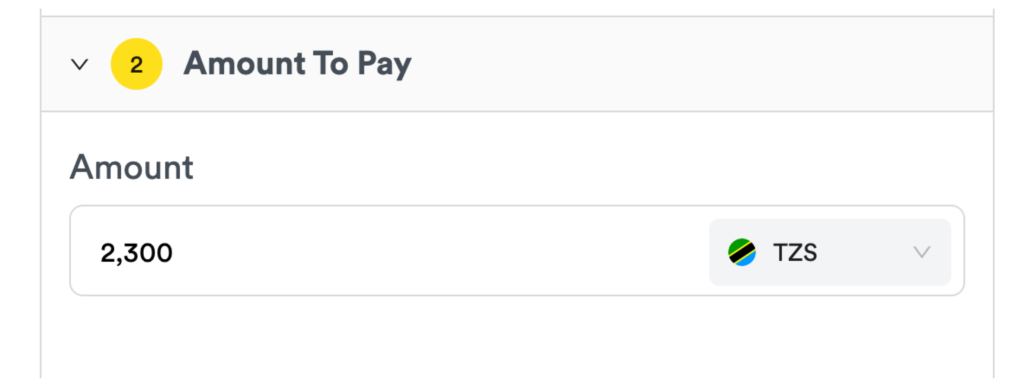
For Payment Pages and Invoices, customers can enter a custom payment amount, which may differ from the originally assigned amount during order creation. However, for Checkout-Links, the amount field is disabled, and customers must pay the full amount as initially assigned during order creation.
### **Amount Section**
For Payment Pages and Invoices, customers can enter a custom payment amount, which may differ from the originally assigned amount during order creation. However, for Checkout-Links, the amount field is disabled, and customers must pay the full amount as initially assigned during order creation.
 ### **Payment Method Selection**
In this section, customers will see a list of available payment methods. Each payment method is accompanied by a logo, a commonly known name, information on supported currencies, processing fees, and exchange rates (if applicable).
### **Payment Method Selection**
In this section, customers will see a list of available payment methods. Each payment method is accompanied by a logo, a commonly known name, information on supported currencies, processing fees, and exchange rates (if applicable).
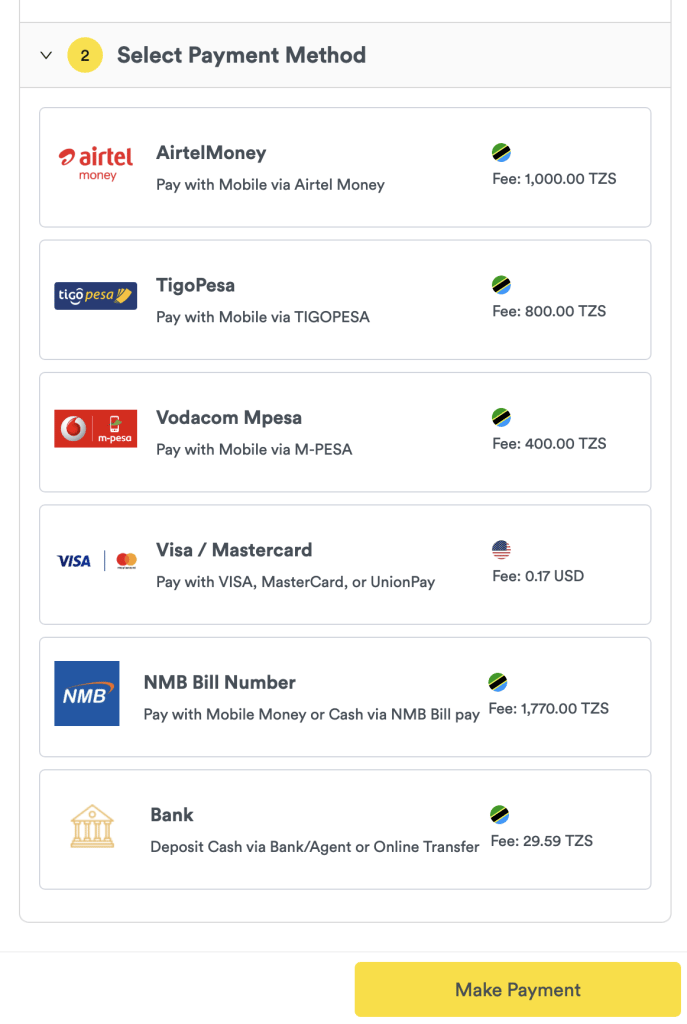 Integrated payment methods include:
* TIGOPESA PUSH USSD which supports TZS payments
* AIRTEL MONEY PUSH USSD which supports TZS payments
* TIGOPESA BILLPAY which supports TZS payments and is a backup of TIGOPESA USSD, i.e. it is only available if TIGOPESA PUSH USSD is not available.
* NMB BILLPAY which supports TZS payments
* CARDS (VISA, MASTERCARD, and UNION PAY) which supports USD payments
* BANK DEPOSIT/TRANSFER.
The availability of payment methods depends on various factors, including ClickPesa team decisions, merchant preferences, and currency exchange settings.
* **ClickPesa Team Decisions** The ClickPesa team has the authority to enable or disable payment methods for a specific merchant.
* **Technical Complications and Integration Issues** ClickPesa may enable or disable an individual payment method if technical complications or integration issues arise.
* **Merchant Preferences** Merchants have control over their payment method offerings within their merchant dashboards. They can enable or disable specific payment methods based on their preferences and the expectations of their customers.
* **New Merchant Settings** For new merchants joining the platform, all payment methods are initially disabled. Merchants need to log in to their ClickPesa dashboard and manually enable the payment methods they wish to offer.
* **Currency Exchange Feature** The currency in which an order (Payment Page, Invoice, or Checkout Link) is denominated and the exchange capabilities within ClickPesa also influence payment method availability. If the exchange feature for a particular currency is disabled, only payment methods that support that currency will be available for orders denominated in that currency.
### Fee
Customer will be responsible for all the fee encountered during making payments. [Click here](https://clickpesa.com/payment-gateway/pricing/) to learn more about how we charge fees.
### **Payment Initiation**
After filling in the necessary details and selecting a suitable payment method, users can initiate the payment. The system will provide instructions on how to complete the payment. At this point, the payment will be in "PROCESSING" status, and its progress can be monitored in the ClickPesa dashboard of the merchant.
### **Payment Completion**
* If the customer successfully follows the instructions and completes the payment, they will be redirected to a receipt page, displaying a summary of their successful payment. Then funds will shortly be settled to your wallet. This will send [notification](/dashboard/notifications) to you via email or merchant dashboard.
* Customer will also receive notification via sms or email on successfully payment.
* If the payment timer runs out or if the transaction fails, the customer will be redirected to the receipt page with information about the failed payment.
* In the event that the payment is still in a "PROCESSING" state, the receipt page will display a loader until the payment reaches a "failed" or "successful" state.
* Users also have the option to go back or try the payment again based on whether the payment was successful or failed.
* Successfully card payments can be REVERSED or REFUNDED upon request to do so.
Hosted Checkout is designed to cater to the following common use cases:
## Common Use Cases
1. Paying for Payment Pages created by ClickPesa merchants.
2. Settling Invoices issued by ClickPesa merchants.
3. Finalizing payments for Checkout Links, as detailed in the Checkout-link documentation.
## Frequently Asked Questions
1. Where can I find the Payment Page or Invoice?
* The links can be found in the ClickPesa dashboard within their respective sections. Check documentation for [e-invoice](/dashboard/e-invoice) and [payment page](/dashboard/payment-pages).
2. How to generate Checkout-Link links
* Please see the [documentation for checkout-link](/checkout/checkout-link)
3. Can I modify the payment amount for Payment Pages and Invoices?
* Yes, for Payment Pages and Invoices, customers can enter a custom payment amount, which may differ from the originally assigned amount during order creation.
4. What payment methods are available for Hosted Checkout?
* Hosted Checkout supports various payment methods, including:-
* TIGOPESA PUSH USSD
* * AIRTEL MONEY PUSH USSD
* * TIGOPESA BILLPAY
* * NMB BILLPAY
* * CARDS (VISA, MASTERCARD, and UNION PAY)
* * BANK DEPOSIT/TRANSFERPayment methods may or may not be available depending on factors such as merchant preferences, currency exchange settings, or ClickPesa team decisions.
5. What happens if my payment is still in "PROCESSING" status while on the receipt page?
* If your payment is in "PROCESSING" status, the receipt page will display a loader until the payment reaches a "failed" or "successful" state.
6. How do I handle a failed payment through Hosted Checkout?
* If your payment fails, the receipt page will provide information about the failed payment and offer options for retrying the payment.
Integrated payment methods include:
* TIGOPESA PUSH USSD which supports TZS payments
* AIRTEL MONEY PUSH USSD which supports TZS payments
* TIGOPESA BILLPAY which supports TZS payments and is a backup of TIGOPESA USSD, i.e. it is only available if TIGOPESA PUSH USSD is not available.
* NMB BILLPAY which supports TZS payments
* CARDS (VISA, MASTERCARD, and UNION PAY) which supports USD payments
* BANK DEPOSIT/TRANSFER.
The availability of payment methods depends on various factors, including ClickPesa team decisions, merchant preferences, and currency exchange settings.
* **ClickPesa Team Decisions** The ClickPesa team has the authority to enable or disable payment methods for a specific merchant.
* **Technical Complications and Integration Issues** ClickPesa may enable or disable an individual payment method if technical complications or integration issues arise.
* **Merchant Preferences** Merchants have control over their payment method offerings within their merchant dashboards. They can enable or disable specific payment methods based on their preferences and the expectations of their customers.
* **New Merchant Settings** For new merchants joining the platform, all payment methods are initially disabled. Merchants need to log in to their ClickPesa dashboard and manually enable the payment methods they wish to offer.
* **Currency Exchange Feature** The currency in which an order (Payment Page, Invoice, or Checkout Link) is denominated and the exchange capabilities within ClickPesa also influence payment method availability. If the exchange feature for a particular currency is disabled, only payment methods that support that currency will be available for orders denominated in that currency.
### Fee
Customer will be responsible for all the fee encountered during making payments. [Click here](https://clickpesa.com/payment-gateway/pricing/) to learn more about how we charge fees.
### **Payment Initiation**
After filling in the necessary details and selecting a suitable payment method, users can initiate the payment. The system will provide instructions on how to complete the payment. At this point, the payment will be in "PROCESSING" status, and its progress can be monitored in the ClickPesa dashboard of the merchant.
### **Payment Completion**
* If the customer successfully follows the instructions and completes the payment, they will be redirected to a receipt page, displaying a summary of their successful payment. Then funds will shortly be settled to your wallet. This will send [notification](/dashboard/notifications) to you via email or merchant dashboard.
* Customer will also receive notification via sms or email on successfully payment.
* If the payment timer runs out or if the transaction fails, the customer will be redirected to the receipt page with information about the failed payment.
* In the event that the payment is still in a "PROCESSING" state, the receipt page will display a loader until the payment reaches a "failed" or "successful" state.
* Users also have the option to go back or try the payment again based on whether the payment was successful or failed.
* Successfully card payments can be REVERSED or REFUNDED upon request to do so.
Hosted Checkout is designed to cater to the following common use cases:
## Common Use Cases
1. Paying for Payment Pages created by ClickPesa merchants.
2. Settling Invoices issued by ClickPesa merchants.
3. Finalizing payments for Checkout Links, as detailed in the Checkout-link documentation.
## Frequently Asked Questions
1. Where can I find the Payment Page or Invoice?
* The links can be found in the ClickPesa dashboard within their respective sections. Check documentation for [e-invoice](/dashboard/e-invoice) and [payment page](/dashboard/payment-pages).
2. How to generate Checkout-Link links
* Please see the [documentation for checkout-link](/checkout/checkout-link)
3. Can I modify the payment amount for Payment Pages and Invoices?
* Yes, for Payment Pages and Invoices, customers can enter a custom payment amount, which may differ from the originally assigned amount during order creation.
4. What payment methods are available for Hosted Checkout?
* Hosted Checkout supports various payment methods, including:-
* TIGOPESA PUSH USSD
* * AIRTEL MONEY PUSH USSD
* * TIGOPESA BILLPAY
* * NMB BILLPAY
* * CARDS (VISA, MASTERCARD, and UNION PAY)
* * BANK DEPOSIT/TRANSFERPayment methods may or may not be available depending on factors such as merchant preferences, currency exchange settings, or ClickPesa team decisions.
5. What happens if my payment is still in "PROCESSING" status while on the receipt page?
* If your payment is in "PROCESSING" status, the receipt page will display a loader until the payment reaches a "failed" or "successful" state.
6. How do I handle a failed payment through Hosted Checkout?
* If your payment fails, the receipt page will provide information about the failed payment and offer options for retrying the payment.